Preview of Final Results
Tutorial Resources
- Model – Mirish
- City – Almudena-Stock
- Wolf – Xcrystals
- Clouds – Chainbound
- Sky – Freestock.ca
- Sky – xdante-stock
- Fur Brushes –Snow-body
- Sea – Dragoroth-stock
- Crack Brushes – Funerals0ng
Step 1 – Size
The size of this image is going to be 2000px of width and 1282px of height
Step 2 – Base
Start with a base image like this:
Step 3 – City
Place the image of the city and chage the layer mode to overlay.
Step 4 – Layer Mask
Attached a layer mask to the image of the city and hide some parts with the black brush.
Step 5 – clouds
As before place the image of the sky and add a layer mask to it.
Change the layer mode to soft light and paint over the border of the image to blend it with the city
Step 6 – sky
Place the image of the sky
Change the saturation to -100
Step 7 – blending
Change the layer mode to soft light. Also add a layer mask and hide some part of the images to blend it with the layer below. Hide the parts of the clouds that are covering the buildings
Step 8 – Decay
In a new layer (Shift + Ctrl + N) in soft light mode paint cracks in the buildings, for this you can use brushes.
Step 9 – Model
Place the model in the background and select her with the lasso tool
Step 10 – layer mask
Add a layer maskt to the model’s layer and you will see how the background of the model’s dessapear
Step 11 – details
With a small black brush pass over the edges to have a clean cut of the model.
Step 12 – skin
Select the model’s sking with the lasso tool, duplicate selection (Ctrl + J) press (Ctrl +U) to access to the hue/saturation menu and reduce the saturation to -25
Step 13 – Screen
Duplicate the layer once again (ctrl+j) change the layer to screen mode, reduce the opacity to 40%
Step 14 – Hairs
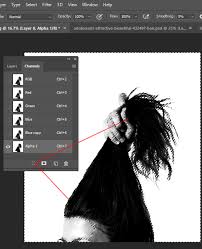
To make the model’ s hair pick a soft round brush (white) with 1px and 2px and paint some hair strands.
As you can see in the image below in the top of the head and in the bottom the strands are fine, make some wavy hairs to give the impression of movement.
Step 15 – Make up
To add the make up to the model create a new layer (Shift + Ctrl + N) with the eyedropper tool pick the same color of the eyebrow of the model and paint over it to make it stronger.
Paint below the eyebrow with a white brush, also make a little white spot in the eye.
Paint the lips with a red tone and in the middle create a reflection with a white brush.
Step 16 – building
Return to the model’s layer and duplicate (ctrl+j) now paint with a black brush to hide everything except the building here the model is, use the layer in soft light mode. This will give more contrast to that part.
Step 17 – Shadows
Create a new layer (Shift + Ctrl + N) paint over the left size of the model, where the light is not in contactwith her use the layer in soft light mode, and change the opacity of the brush depending of how hard you want the shadow to be.
Step 18 – Wolf
Same as before, place the wolf image, select the wolf with the lasso tool and add a layer mask to complete the selection. You will have something like this:
Step 19 – Hairs
You have to paint hairs so the wolf can look natural, so you can paint one by one or use fur brushes, use the eyedropper tool to pick the exact same color of the wolf
Step 20 – Shadows
In a new layer (shift+ctrl+n) paint with a soft round black brush over the wolf creating shadows in his hair, use a low opacity from 5% to 10%. Has to be something really soft.
Step 21 – Strokes
You can add some reflexions in the coat of the wolf with a soft round white brush with 1px size, to make details stand out.
Step 22 – light
Let’s work over the city light, in a new layer paint with a soft round brush with low opacity (20%) in the size where the light is reaching the buildings and the model. Use the layer in normal mode. Also you can work the light in several layers. You can start by making the light of the city with ta bigger brush and for the model you can use a small brush se the direction of the light and how it affects the image.
Step 23 – The sun
To create the sun pick a soft round brush in a yellow tone and just make a circle like this
Go to the option Filter – Blur – Gaussian Blur and add 30% of radius, can be more radius if you need to. This will give a softer look.
Now change the layer mode to screen and duplicate the layer ctrl + J to give more intensity.
Step 24 – Water
Place the image of the water in the image like this:
Add a layer maska and hide the sky and the stones
Step 25 – Water
Paint some water running dow the streets, you can also use images of water or brushes to fit with the image.
Step 26 – Sun rays
In a new layer add some sun rays, to the image. Paint them with a soft brush. Use the layer in normal mode with 50% of opacity
add a layer mask and paint over the edges to make them softer. Try to make the sunrays strongest in the top and really soft in the bottom.
5
Also paint the reflexion of the light in the water. With a soft round brush in a yellow tone, use the layer in overlay mode and the opacity of the brush 20%
Step 27 – Sunset
Place the image of the sunset like this:
Then use the layer in overlay with 80% of opacity and add a layer mask.
Paint all over the image, over the edges until the image is blend with the rest. As you can see in the image above the visible parts where the light is strongest.
Step 28 – lighting
To make the lighting more dramatic in a new layer paint with a darker cool brown and and orage tone, paint the model and the worl, remember to use the layer in soft light mode.
Step 29- light
In a new layer paint with with warm tones, use the brush with 30% of opacity size 400
Now change the layer to soft light
Step 30 – dark
In a new layer paint around the edges of the image to make a sort of frame use a soft round black brush with 30% of opacity size 400px
Step 31 – the final touch
Go the menu layer – new adjustmente layer – color lookup.
Choose the option filmstock_50.3 and reduce the opacity to 80% and the fill to 30%
Final Results
Source: http://www.photoshoptutorials.ws/photoshop-tutorials/photo-manipulation/composite-destroyed-city-scene-retouch-characters-photoshop/