


In the world of online shopping, your customer cannot touch, smell, or try on your product. They only have their eyes. If a product image looks jagged, poorly cut, or “pasted” onto a background, trust vanishes instantly. To stand out globally, you need more than just a basic cutout. You need advanced clipping path techniques for complex product images.
Whether you are selling high-end jewellery, intricate machinery, or fashion with fine details, the “Pen Tool” is your best friend. But there is a massive difference between a quick trace and a professional-grade path. Let’s dive into how you can achieve pixel-perfect results that drive conversions.
What Makes a Clipping Path “Advanced”?
A standard clipping path is just an outline around a simple object, like a book or a bottle. However, when you deal with “complex” items, the difficulty spikes. These objects often have internal “holes” or transparent areas that need to be isolated.
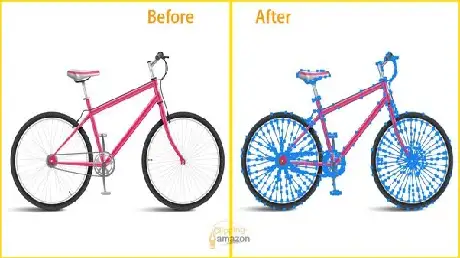
Advanced clipping path techniques for complex product images involve creating multiple paths for a single item. Imagine a bicycle. You don’t just need a path around the outside; you need to cut out the spaces between the spokes, the chain links, and the frame. This level of detail ensures that when you place the bike on a new background, it looks natural, not like a sticker.
The Power of Multi-Path Editing
One of the most useful tricks for pros is the “Multi-Path” technique. Instead of one single loop, you create different paths for different parts of the product.
- Color Swapping: You can change the color of just the laces on a shoe without touching the leather.
- Shadow Control: You can isolate the sole of a boot to apply a specific reflection.
- Texture Depth: It allows you to adjust the brightness of specific sections to make the product look more 3D.
Human Precision vs. AI Automation
We live in an age of AI, but when it comes to advanced clipping path techniques for complex product images, a human eye is still king. AI often struggles with “low contrast” edges—where the product color is similar to the background.
A professional editor knows exactly where to place an anchor point. They understand how light wraps around a curve. By manually drawing these paths, you avoid the “fuzzy” or “blurry” edges that automated tools often leave behind. For a luxury brand, that 1 pixel of difference is the difference between looking premium or looking cheap.
Handling “The Impossible Edges”
Some products are a nightmare for standard editors. Think of a bridal veil, a mesh chair, or a diamond necklace.
- Compound Paths: This is where you combine several paths to create one complex selection. It’s essential for items with “islands” of background showing through.
- Zoom Accuracy: Pros work at 300% magnification. This ensures the path is tucked slightly inside the product edge, preventing any “color bleed” from the original photo.
Why Worldwide Brands Invest in Quality
If you are selling globally, your images must be responsive and high-resolution. Modern displays (like Retina or OLED screens) are incredibly sharp. They reveal every flaw. If your clipping path isn’t perfect, the consumer will see it.
Using advanced clipping path techniques for complex product images ensures your brand maintains high EEAT (Expertise, Authoritativeness, and Trustworthiness). When your visuals are flawless, customers perceive your business as professional and reliable. This leads to fewer returns and higher customer satisfaction because the product looks exactly as expected.
How to Improve Your Workflow Today
If you are struggling with complex cutouts, stop using the magic wand or quick selection tools. They are too aggressive. Instead, focus on these three tips:
- Stick to the Pen Tool: It takes longer to learn, but the vector results are infinitely scalable.
- Use Path Layers: Always save your paths in Photoshop. This allows you to go back and make tweaks months later without starting over.
- Watch Your Curves: Use as few anchor points as possible. Fewer points lead to smoother, more natural-looking curves.
Final Thoughts for E-commerce Success
Great photography gets people to look, but great editing gets them to buy. By mastering advanced clipping path techniques for complex product images, you take full control over your visual branding. You gain the power to change colors, remove distractions, and present your products in the best possible light.
High-quality imagery isn’t an expense; it’s an investment in your brand’s global reputation.
