


Jewellery photography is a game of light. But because gold, silver, and gemstones are essentially tiny mirrors, that light often turns into distracting glares. Whether you’re selling on Etsy or shooting for a high-end brand, reflections can make a luxury piece look cheap.
Mastering the “sparkle” without the “glare” is what separates amateur snapshots from professional catalogue images. Here is how to handle reflections like a pro.
1. Why Jewellery is a “Reflection Magnet”
Jewellery features highly polished surfaces and complex facets. When light hits these surfaces, it bounces back at the same angle it arrived. This means your camera, your studio lights, and even your own shirt can end up visible on a wedding ring. The goal isn’t just to “fix it later” in Photoshop, but to control that light before you ever press the shutter.
2. Essential Gear to Block Glares
You don’t need a million-dollar studio, but these three tools are game-changers:
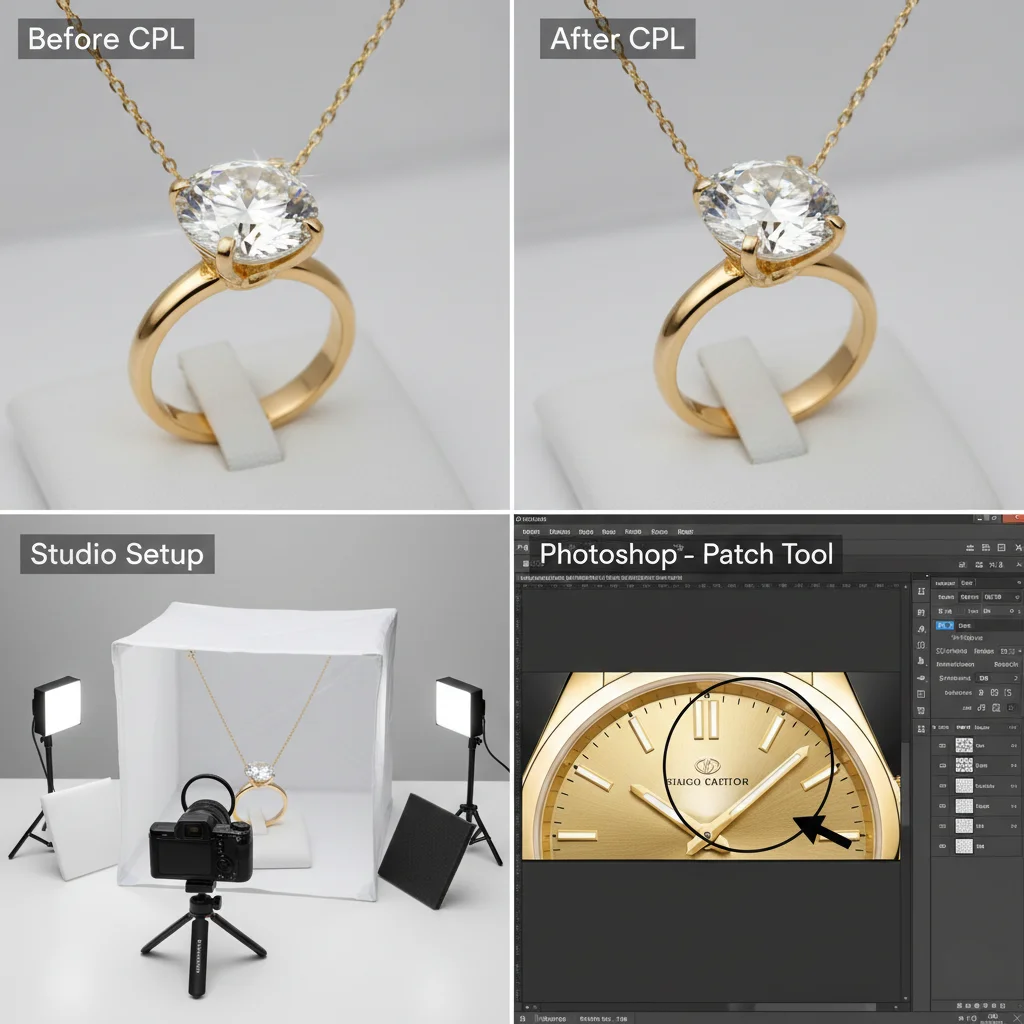
- Light Tents: These fabric boxes wrap your jewellery in soft, even light from all directions, eliminating harsh “hot spots”.
- Polarising Filters (CPL): Think of these as sunglasses for your lens. By rotating the filter, you can physically cut out reflections on gemstones.
- Black & White “Flags”: Use small pieces of black cardboard to create “dark reflections” (which add depth) and white cards to bounce light into shadowy corners.
Here’s an example of how a polarising filter can make a huge difference, along with the other gear in action:
3. In-Camera Tricks: Save Time on Editing
The best way to remove reflections is to never let them happen. Try these steps during your shoot:
- Go Indirect: Never point a bare bulb at jewellery. Bounce your light off a white wall or through a silk diffuser.
- The 45-Degree Rule: Position your lights at a 45-degree angle to the piece. This usually sends the reflection away from the lens rather than straight back into it.
- Clean Everything: A single fingerprint can look like a massive smudge under a macro lens. Use a microfibre cloth and handled gloves.
- Shift Your Body: Sometimes moving your camera just one inch to the left or right will make a distracting reflection disappear.
4. Pro Editing: Fixing Reflections in Photoshop
Even with perfect lighting, some glares are unavoidable. Here is the professional workflow for post-processing:
The “Quick Fix” Tools
For small spots or dust, the Spot Healing Brush is magic. For more control, use the Clone Stamp Tool (set to a soft brush) to paint clean metal over a reflected glare.
The Patch Tool
If you have a large, messy reflection on a flat surface (like a watch face), the Patch Tool is your best friend. Circle the glare, drag it to a clean area, and Photoshop will blend the textures perfectly. Here’s a visual of the Patch Tool in action to remove a reflection:

Advanced: Frequency Separation
This is the “secret sauce” for high-end retouching. It separates the color of the jewellery from the texture. This allows you to smooth out a reflection’s colour without losing the crisp detail of the metal or stone.
Handling Gemstones
Diamonds are tricky because they have so many angles. If a facet is too bright:
- Create a Curves Adjustment Layer.
- Darken the image.
- Invert the mask (so it disappears).
- Use a small white brush to “paint” the darkness only onto the over-bright facet.
5. Summary Workflow
- Prep: Clean the jewellery and use a tripod.
- Diffuse: Use a light tent or softbox.
- Refine: Use black/white cards to shape the shadows.
- Edit: Use the Clone Stamp for small spots and Curves for brightness.
Leather Product Photography & Studio Lighting & Retouching Tips
Final Thought
In the world of e-commerce, your photo is the only thing the customer can touch. When you remove distracting reflections, you aren’t just “cleaning an image”—you’re building trust. A clean, sparkling photo tells the customer the piece is high-quality and worth the investment.
