
What Is a Path?
Think of a path in Photoshop like an invisible thread you can lay over your image. It’s a smooth line made of points and curves that you can shape exactly how you want. The cool part? Paths don’t rely on pixels which means they won’t get blurry no matter how much you zoom or resize. They’re perfect for cutting out objects or creating crisp shapes.
Short answer: A path is a vector line made of anchor points that helps you create precise shapes or selections in Photoshop.
Why Should You Use Paths?
Paths are like having superpowers for your Photoshop projects. They let you be precise—far more than just the usual selection tools. I remember trying to cut out a complex object without paths, and it felt like wrestling a slippery fish. With paths, you get smooth edges and control that feels almost magical.
Short answer: Paths give you precise, smooth, and scalable control over selections and shapes.
Meet the Pen Tool: Your New Best Friend
If Photoshop was a kitchen, the Pen Tool would be your sharpest knife. It can seem tricky at first, but once you get the hang of it, it’s your go-to for making paths. You place points called “anchor points” and Photoshop connects them with lines or curves. Think of it as plotting dots on a map and drawing roads between them.
Short answer: The Pen Tool creates paths by placing anchor points and drawing lines or curves between them.
Setting Up Photoshop for Path Creation
Before you start, make sure Photoshop’s ready to help. Open the Paths panel by going to Window > Paths. Also, check the Pen Tool settings on top set it to “Path” mode, not “Shape” or “Pixels.” This little step keeps your paths clean and editable, kind of like choosing the right brush before painting.
Short answer: Open the Paths panel and set the Pen Tool to “Path” mode before you start drawing.
How to Create Your First Simple Path
Let’s get practical. Grab the Pen Tool (shortcut: P). Click once to make your first point. Click somewhere else, and Photoshop connects the dots with a straight line. Keep clicking around your subject to outline it. When you’re done, click back on the first point to close the path. You just made your first path!
Short answer: Click points with the Pen Tool to create a path, and close it by clicking the first point again.
Drawing Straight Lines with Confidence
Want to keep things simple and straight? Just click for each corner point. Holding down Shift locks your line to 45-degree angles, which is a lifesaver for clean, sharp edges—think perfect polygons or boxy shapes.
Short answer: Click points for straight lines; hold Shift to snap lines to 45-degree angles.
Mastering Curves: The Art of Smooth Paths
Curves can seem intimidating, but here’s a trick: click and drag when placing a point to pull out “handles.” These handles shape the curve, like bending a flexible wire. The longer you drag, the smoother and wider the curve. It’s a bit like steering a race car small moves, big impact.
Short answer: Click and drag points to create smooth curves using direction handles.
Editing Paths Like a Pro
Made a mistake? No worries. Switch to the Direct Selection Tool (A), click on any anchor point, and drag it around to tweak your path. Want to add or remove points? The Pen Tool has handy plus (+) and minus (-) options. Editing paths feels like adjusting a puzzle piece until everything fits just right.
Short answer: Use the Direct Selection Tool to move points, and the Pen Tool’s add/delete options to edit paths.
Saving and Naming Paths So You Don’t Lose Them
Paths can be a pain to recreate, so save your work! Open the Paths panel and click the “New Path” button. Rename your path to something memorable, like “Logo Outline” or “Cutout.” I always do this because you don’t want to redo a perfect path just because it vanished.
Short answer: Save your path in the Paths panel by creating and naming a new path.
Turning Paths into Selections Quick and Easy
Once your path looks good, you can turn it into a selection by clicking the little “Load Path as Selection” icon at the bottom of the Paths panel. Boom — your path becomes a marching ants selection. This is great for cutting, masking, or any edits you want to apply inside the selection.
Short answer: Click “Load Path as Selection” in the Paths panel to convert a path into a selection.
Converting Paths to Shape Layers for Flexibility
Want your path to be a shape you can color or style? Right-click on the path and choose “Fill Path” or “Stroke Path.” Or convert it directly to a shape layer for full control over colors and effects. This makes paths super versatile, like having a moldable sculpture you can paint.
Short answer: Fill or stroke your path, or convert it to a shape layer for editable shapes.
Using Paths to Create Cool Text Effects
Here’s a fun one: use your path as a guide for text! Create any shape with the Pen Tool, then pick the Text Tool and hover over the path until you see a wavy line cursor. Click, and your text will flow along the curve. Perfect for fancy logos or invitations.
Short answer: Use the Text Tool on a path to make text follow curves or shapes.
Practical Ways I Use Paths Every Day
From clipping tricky product photos to designing sleek logos, paths are my daily bread. One time, I had to remove a detailed watch from a busy background. The Pen Tool saved me hours by making a clean, sharp cutout that looked professional. No fuzzy edges, no guessing just crisp precision.
If you work with product photos regularly, especially for eCommerce, learning how to create paths is key to delivering pixel-perfect results using professional clipping path services.
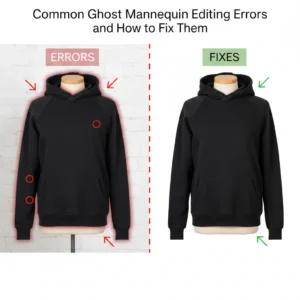
Paths also play a big role in ghost mannequin services when editing apparel images—letting you isolate clothes cleanly without jagged edges.
And if you’re in jewelry photography, combining paths with advanced editing techniques is essential. We often use them in our jewelry retouching services to outline delicate pieces before enhancing shine and removing dust.
Short answer: Paths help create precise cutouts, logos, and custom text effects.
Wrapping It Up: Paths Are Game-Changers
Paths might seem tricky at first, but they’re worth every minute you spend mastering them. They give you control and flexibility that’s hard to beat. Once you get comfortable, you’ll wonder how you ever managed without them.
Short answer: Learning to create paths unlocks precise, flexible editing in Photoshop.
FAQs
- What exactly is a path in Photoshop?
A path is a vector line made of points and curves that helps you make precise shapes or selections. It stays sharp no matter the size.
- How do I make a curve with the Pen Tool?
Click and drag to pull out handles on an anchor point, which shapes the curve smoothly.
- Can I change a path after I create it?
Absolutely! Use the Direct Selection Tool to move points or adjust curves anytime.
- How do I save my path so I can use it later?
Go to the Paths panel, click the “New Path” button, and give your path a name.
- What’s the fastest way to turn a path into a selection?
Click the “Load Path as Selection” button in the Paths panel to switch from path to selection instantly.