


Final Product What You’ll Be Creating

Layer and clipping masks are powerful tools in Adobe Photoshop that allow you to control the visibility and transparency of different parts of a layer. But did you know that you can apply multiple pixel masks to a single layer?
Now you may think how do I apply multiple pixel masks to the same layer in Adobe Photoshop? This advanced technique gives you unparalleled control over your edits and adjustments.
In this tutorial, Using Adobe Photoshop, we’ll solve your question about how to apply multiple pixel masks to the same layer in Adobe Photoshop, enabling you to achieve intricate and precise effects.
How Do I Apply Multiple Pixel Masks to the Same Layer?
![]()
Applying multiple pixel masks to the same layer in Adobe Photoshop or other editing software can be a useful technique for creating complex and targeted adjustments. Here’s a brief step-by-step guide on how to achieve this:
Step 1: Open Your Image
Begin by opening the image you want to work on in Adobe Photoshop actions. Make sure you have the layer you want to apply multiple masks to ready.
Step 2: Create a Layer Mask
First, create a layer or clipping mask for the target base layer. This initial mask will serve as the foundation upon which you’ll apply additional masks.
To create a layer mask, select the desired layer and click on the “Add Layer Mask” button at the bottom of the layers properties panel. This will add a white layer mask thumbnail next to your layer.
Step 3: Add Additional Layer Masks
Now comes the exciting part. To add multiple pixel masks to the same layer, you’ll create selections and then turn those selections into masks.
![]()
Make a Selection: Use any selection tool (Marquee, Lasso, Pen, etc.) to create a selection around the area you want to pixel mask. This can be as simple as a shape or as complex as a detailed object. Make sure the initial layer mask is selected in the Layers panel.
Convert Selection to Mask: With the active selection, click the “Add Layer Mask” button again. Photoshop will turn your selection into a new layer mask linked to the original vector mask.
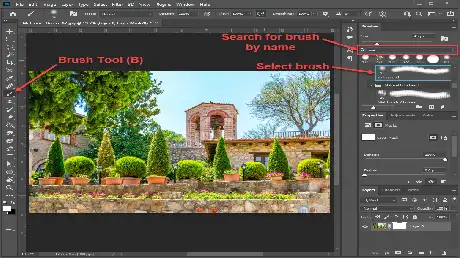
Refine the Mask: Using the brush tool, you can refine each mask individually. Select the mask thumbnail of the new quick mask you’ve just created and use a black brush to hide parts of the image or a white brush to reveal areas. You can also use shades of gray to create partial transparency.
Step 4: Repeat for Additional Masks
Repeat Step 3 for as many masks as you need. Each new mask will add another layer of control to your editing process. Remember to select the mask layer thumbnail of the mask you want to work on before using the brush tool.
Step 5: Adjust Mask Opacity and Feathering
You can adjust the opacity of each mask to control its strength. Lower the opacity to make the mask’s effect more subtle. Additionally, you can use the “Feather” option to soften the edges of your mask, creating smoother transitions between masked and unmasked areas.
Step 6: Experiment and Fine-Tune
The beauty of applying multiple masks to the same layer is that you can experiment with different effects and adjustments. You can stack masks to create complex edits, such as combining exposure adjustments with selective color range changes. Fine-tune each mask until you achieve the desired result.
Step 7: Group and Organize
Adding multiple masks to your layer might make your multiple-layer panel cluttered. Consider grouping your masks and the corresponding adjustment layers into layer groups to keep things organized. The adjustment layer will make it easier to manage and toggle different effects.
Conclusion
Applying multiple pixel masks to the same layer in Adobe Photoshop opens up a world of creative possibilities. By following the steps outlined in this tutorial, you can achieve intricate edits and adjustments that would be challenging using a single mask.
Remember to experiment, refine, and organize your masks to create stunning and professional-looking multiple images. Happy editing!


